| 2. Protection key not found |
The following message comes up when you try to scan or load an image:
Protection key not found. Please verify its installation.
This means that our software program cannot locate the hardware protection key required for its proper functioning. It must be connected to the computer on which the program is running.
-
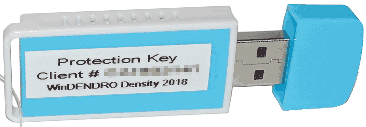
The key can be one of 4 models, 3 USB models are illustrated below. If you own a beige paralllel port key, it cannot be run under Windows 10 and 11 (your only option is to update your software).
|
|
|
Cyan protection key
No driver installtion required
|
Black protection key
You must install driver 7.6.8
|
Purple protection key
You must install driver 7.6.8
|
You can download the 7.6.8 driver file by clicking here.
- There are a few reasons why the program might not be able to find the key. Here are a few things to verify or do:
1) Drivers must be installed before connecting the key. If you did not or are unsure, try uninstalling it (using the same software as for installation), restarting the computer, reinstalling the drivers (try with the default settings), restarting the computer then connecting the key.
2) Make sure the key is connected directly to one of the computer's USB port (not via a USB hub, monitor or else).
3) Make sure you are using the right key for the software. Check that the software model it unlocks written on the key is the same as the software model you are trying to use (written in its Welcome screen at startup).
If these suggestions does not work, contact technical support.
|
| 3. How to install, update or upgrade our software programs? |
- For software with the cyan protection key (see above pictures): Our software programs are stored on the key along with its instruction manuals (in pdf) and demo images. Simply copy these to your computer desktop. Double click the program's icon to start it (WinDENDRO.exe, WinRHIZO.exe...).
- For software with older purple or black protection key: These software programs came on a CD or DVD labeled with the product name and its version (e.g. WinDENDRO Reg 2016a). Simply copy its content to your computer desktop. Note that if you work with Windows 10 or 11 you should install key drivers version 7.6.8 that you can get above in "PROTECTION KEY" rather than the version on the CD/DVD. Double click the program's icon to start it (WinDENDRO.exe, WinRHIZO.exe...). Note: if you have lost the CD, you can also copy the files from any computer or backup which has them. If your software is not too old, we can also produce a USB Media replacement or personalised download link for a fee (contact our sales dept for details).
- For software with beige parallel port protection key: it cannot be run under Windows 10 and 11, you should update your software.
|
| 4. What is the best way to learn how to use Regent's programs? |
The only way is to read the Introduction Chapter(s) of its Instruction Manual and try the examples with our demonstration images. These images are easy to analyse and show typical applications. For WinRHIZO and WinSEEDLE, see also the Video Tutorial that comes with these products (it shows how to install the material, scan and analyse a sample). |
| |
| 5. The ijl15.dll file is not found by the program. |
Upon starting one of our program, the following message comes up :
The code execution cannot proceed because ijl15.dll was not found. Reinstalling the program may fix this problem.
This means the ijl15.dll cannot be found on your computer. Download the file by clicking here. After download, unzip and move it in the program's folder beside its .exe file (WinDENDRO.exe, WinRHIZO.exe...) |
| 6. Compatibility of 32 and 64-bit Software and Operating Systems |
All 32-bit versions of our software programs runs on computers with 32-bit or 64-bit Windows OS versions (Windows 7 to 11).
All 64-bit versions of our software programs ONLY work on computers with 64-bit Windows OS version (Windows 7 to 11). |
| 7. Reasons to upgrade to a 64-bit Software version |
Our 64-bit programs have the same features and functionality as their 32-bit versions except:
- They can load and analyse much larger images.
- They are approximatively 15% faster.
- Unfortunately they can only acquire images via TWAIN64 drivers and these are rare (as of Nov 2021 our STD4800 deos not have such drivers but our thrid generation LA2400 has). When there is no such drivers, the only option is to acquire images with the scanner manufacturer software, save the images and load them in our programs for analysis.
|
| 8. Computer Specifications |
Image analysis is very demanding on computer resources. Below are ideal ones (in date of Nov 2021), those that will make your work pleasant efficient. It can always work on less powerful computers, but analyses will be slower, you might have to reduce image size and some software features might not be available.
- Processor: This item is important. An Intel Core i7, i9, Xeon or AMD equivalent is recommended as these processors are better suited for multimedia. Fastest clock speed is better. 16 Cores is ideal as it gives a speed boost to all our programs but two. Note that newer processors were added since this was written. What matter is to avoid low cost generic processors but favor higher end models designed for multimedia. AI oriented processors have not been tested but we suspect it would not make big differences.
- RAM: 32GB or more and fast ones (2800, 3200, 3500 MHz). Quad channel is faster (for desktop mostly). Note: Only 64-bit versions of our software programs can use all that memory. All 32-bit applications are limited to 2 GB. The more memory there is, the larger the images can be analysed and more complex analyses can be done.
- Operating System (OS): Windows 10 or 11. All of our 32bit programs can work on Windows 32 and 64-bit OS. Our 64-bit programs can only work under Windows 64-bit OS (most computers sold today have 64 bit OS).
- A fast hard drive: SSD is the best and makes a difference in speed when storing or retrieving images.
- An External storage media: for long term image storage (if you want to store them). This can be an external drive with 2, 4 or 8 TB capacity.
- A large screen. 27” or more is good. As the screen size increases, less scroll is required (increased productivity) and the latter has a better overall view of the images and their measurements.
- Video card: No need for high end, 3D or video game accelerated video cards. Our programs are not video intensive. A discreet video card is worth paying for (has its own memory).
|
| 9. Scanners Issues |
- LA2400 Scanner 3rd Generation Scan Area is offset. If you use Regent's software programs version 2021 and older, you must install the TWAIN driver version 6.2 that came with your scanner (on a CD or on our products' key) not the one from Internet. If you use versions 2022 or more you must install version 6.5 or more (take it from our products key, it has been tested to work with our software).
- 32-bit or 64-bit version of Regent's software program compatibility with scanners: If you received both the 32 and 64-bit versions of our program(s), it is best to use the 64-bit version because it is faster (10 to 40%) and can analyse larger images. There are some instances when the 32-bit version must be used and the 64-bit cannot: When acquiring images directly from our programs with our STD4800, LC4800 scanners and many others on the market. These scanners don't have the required 64-bit TWAIN driver, therefore the 64-bit version cannot acquire images directly from them. As of July 2022, only our LA2400 scanner third generation has this 64-bit driver. This scanner allows to acquire images from both the 32 and 64-bit versions of our programs.
- Vertical bands in images and/or extremely slow scanning time and/or the image is overexposed (very bright): This can occur when scanning with the TPU light (usually in grey levels) and that there is an object (roots, frame, tray, dust....) is present in the TPU slit calibration area (the first 1.8 cm of the scan glass area near the origin, the side where the scanning head is parked). Make sure there are no objects there, and occasionally clean this area and the TPU cover glass. If this (these) problem(s) happens with the reflective light (usually in color scans) then there might be dusts or other debris under the scan bed glass. This can sometimes be fixed by the user (contact us for details).
- Scanner makes noise when powered up and red light in front of it is blinking.
Verify that the scanner and TPU light (the scanner cover) are unlocked. There is a padlock at the back of the scanner and on the TPU underside. Make sure they are in the unlocked position.
- The Scanner indicates and error when it is turned on (red light blinking in front of scanner):
Depending on the scanner model, an error is indicated by the lights in front of it (typically a red blinking LED). Refer to the scanner manual for the meaning of the lights status and a hint to the potential cause of the problem. If the error remains, try the following. Disconnect all cables (except power) and devices connected to the scanner (cable from scanner to computer and from scanner to TPU). Turn on the scanner. If it indicates an error, the scanner is probably damaged. If the scanner does not indicate an error, turn it off and connect the TPU unit (if you have one). Turn the scanner on. If the scanner lights indicate an error, the TPU (or scanner) is probably damaged or the TPU is still locked. If it was, unlock it and retry the procedure. If the scanner does not indicate an error, turn it off. Connect the cable that connects it to the computer. Turn on the scanner. If it does not work, the cable is probably damaged. Try replacing it. If none of the above procedures solve the problem, contact tech support and let them know which tests you have done and the results you obtained.
- "Communication Error" message when attempting to scan:
This message means our software cannot send commands to the scanner and it can be displayed in these situations: 1) If the scanner is not powered on and well connected to the computer or the cable is damaged, 2) when you have two or more instances of WinRHIZO running (the first one can communicate but not the others) and 3) an error or a crash occured while using the scanner. To fix this turn off then on the scanner and reboot the computer (it will reset the TWAIN drivers).
- "ADF or ADF Cover is open. Close it and reload the originals" Error message when attempting to scan with TPU (LA Scanner only):
This message means the Velcro between the TPU hinges at the back of the scanner is not at the right position. Make sure it is at the"With Trays" position, and that it presses on the black pin on the scanner top.
If your scanner was purchased after May 2024, it comes with a new simpler Velcro kit. This one is made of only one Velcro band to be installed on the scanner back. Two auto stitching male round Velcro disks are fixed on the scanner surface on two different sides of the black pin that comes out of the scanner. The female Velcro band must rely those two disks by pressing on the black pin to hold it down. It must be installed if you scan with or without trays (or TPU spacers).
|
| 10. Common to All our Software Programs |
This section contains help topics common to all our programs.
- Windows Defender says WinRHIZO32.exe (WinFOLIA32.exe, WinDENDRO32.exe, WinFOLIA32.exe...) is a threat and wants to quarantine it. If Windows Defender displays a message saying that one of our programs is a threat or has a virus (or something equivalent), tell it to trust it and to NOT quarantine it (otherwise you will loose it and won't be able to run it).
- Cannot find WinRHIZO32.exe (WinFOLIA32.exe, WinDENDRO32.exe, WinFOLIA32.exe...) on the protection key. Verify that Windows Defender has not removed it from the key and quarantined it. See previous FAQ question (10.1).
- get a message with an exclamation mark, what does it means? This means you have reach the memory limit of our 32-bit programs. It happens with images around 500 MB (uncompressed). When you reach this limit there are a few things you can do to overcome it: 1) You can crop your images for parts that don't have objects to measure in it, 2) scan in grey levels instead of color (grey levels images consumes four times less memory than color images for the same scan area and dpi), 3) reduce dpi if this is acceptable (you also loose some precision when doing so) or 4) Upgrade to the 64-bit version. The latter is faster and can handle much larger images. Versions 2021b & 2022 has been tested with images up to 8 GB in size (but should work with larger images).
- 32-bit or 64-bit version of Regent's software program?: If you received both the 32 and 64-bit versions of our program(s), it is best to use the 64-bit version because it is faster (10 to 40%) and can analyse larger images. There are some instances when the 32-bit version must be used and the 64-bit cannot: When acquiring images directly from our programs with our STD4800, LC4800 scanners and many others on the market. These scanners don't have the required 64-bit TWAIN driver, therefore the 64-bit version cannot acquire images directly from them. As of July 2022, only our LA2400 scanner third generation has this 64-bit driver. This scanner allows to acquire images from both the 32 and 64-bit versions of our programs. Note that images analysed and saved with the 32-bit version can be opened with their analysis visible in 64-bit version, but that the reverse is not true.
- 32-bit programs memory limits: All 32 bit programs running under Windows can access up to 2GB of RAM memory, even if more than that is installed in the computer. This memory is used by the program itself, the image(s) and its data. There are also some other losses which increase after working with a program for some time. For our 32-bit programs, the largest image size that can be analysed is typically 500MB (once uncompressed) and depends on which analyses are done on them (Color analysis and Debris Filters consumes much more memory as examples). Our 64-bit programs on the other hand, can handle images thousands of times larger. We've tested our 64-bit programs on images up to 8GB (Nov 2021) which is quite large images for todays computers. Imaging devices producing them are also rare (our LA2400 3rd Generation can produce quite large images with its TWAIN 64 driver).
- Batch Analysis Problems: Here are a few things to verify when Batch analysis does not work:
a) Images should be stored on the computer local disk (like C:) not on a remote disk or server.
b) Settings used to analyse the images are correct. To verify this, load an image that won’t analyse in batch and analyse it interactively (click it or make a selection). Look to see if the image is well analysed.
c) Does it always stop or crash on the same image or different ones? If it's the former, try removing it. Maybe it has a problem and is the only one.
d) Ty reducing the number of images in the folder (split in in 2 or 4). As analyses are done over time, there are memory losses and these add up. Maybe up to a point where there is not enough memory to analyse further images.
e) Make sure the analysis you want to do can be done in batch. For WinRHIZO this means do not attempt to do a Topology or Developmental analysis as these require a user interactivee click. For WinFOLIA, the Leaf Morphology mode has the same requirement.
f) Try storing the images in a folder on the desktop rather than one deeply nested in a hierarchy of folders (short path and image names).
If nothing of the above works, then maybe it is a bug in the software version. Older versions (10 to 15 years) are more prone to such problems. Updating it will very likely solve the issue.
- Image Calibration: If you get measurements in px (pixels) that is because the images are not calibrated. Images from scanners do not need user calibration. Those from cameras always do (because the size of a pixel depends on the lens FOV and the distance between the object to measure and the camera). To analyse images from cameras, you must choose “Scale in Image” (or “Object of known dimensions” for older versions) in Calibration/Pixel Size Method. When you are ready to make a calibration, load the image containing the target then activate Calibration/New Calibration and follow the procedure given in the Instruction Manual for this command. Once you make a calibration, it remains effective for images you analyse after, until you cancel it or make another calibration. You can also save and load a calibration (Calibration/Load Calibration & Calibration/Save Calibration) to use it later on other images.
- Main Window is not visible: When this happens, restart the program then choose "Default Settings" + "For Scanner" in the Welcome Window displayed at Startup. If you software is old and does not have this choice, delete the WinRHIZO.cfg file (WinFOLIA.cfg, WinDENDRO.cfg...) that is in the same folder as WinRHIZO.exe (WinFOLIA.exe, WinDENDRO.exe...) and start it by double clcking the latter.
- Missing Title Lines in Data File: This happens when people save data to a new file (one that does not exists) using the "Open" Data menu command instead of "New". The former is to append current analysis data to an existing file (which already has title lines plus previous analyses data lines), the latter to create a new file (which will be added title lines and the current analysis data). In summary, use New when the data file does not exists and Open when it does.
- Problems opening .tif files. If our software program is older than 2021, the first thing to verify is that your .tif file is saved as tiff “uncompressed”. This is an option at saving time in most programs. Verify also that it is 8 bits grey levels or 24 bits color, nothing else. WinDENDRO, unlike our other programs, also supports 12 & 16 bits grey levels and 36 and 48 bits color images for Density or Blue Reflectance analyses. There are many variations of the tiff file format and our programs do not support all of them (layers or multi-resolution images are examples). If a file does not open, try opening it in a program other than the one used to create it and resave the image from there. Note that our most recent programs open more file formats or variants of them than older ones.
- Problems opening .jpg files. As of Nov. 2021, there is one option not supported by our programs and it is the Alpha channel (32 bits color images). Make sure they are 24 bits color.
- Cannot open the XLRhizo.xlsm, XLFolia.xlsm, XLSeedle.xlsm... program obtained from your site or an email message. Windows can sometimes blocks such files when they were obtained from Internet. To unblock a file, right click the .xlsm file then click "Properties". On the "General" tab of the Properties window, activate the "Unblock" check box then click "Apply". Your .xlsm file should now be ready to use.
- Add-in menu not visible in Excel while running the XLRhizo.xlsm, XLFolia.xlsm, XLSeedle.xlsm... program. By default the Add-In menu should be displayed. If it is not you can turn its display on manually. For this, go to "File/Options" then go to the "Customize Ribbon" tab, and check the "Add-ins" option to the right (under "Customize the Ribbon".
- I have lost my CD/DVD with Regent's programs. We don't have a download site for our software programs. There are too many of them (different products, models, years) and not all sales are the same (some people buy options, some don't, the Scanner.cal file differs...).
• You can find the our software program on the CD/DVD at the back of it's Instruction Manual.
• You can also copy it from any computer which has this software installed on it or from any backup done since you own the software.
• Note that you can get the key drivers 7.6.8 required by all our programs in this FAQ section (required only with older purple or black keys).
• If you don't have any of these, you can purchase a media kit replacement (if your software is not too old, typically 10 years). This media can be a USB drive sent by mail or a personalised Internet download link. Both would contain a copy of what you purchased back then (software(s), manuals, calibration file...). If you are interested, please contact our sales department. Note that the USB drive mentioned here is for software storage only (it replaces CDs and DVDs), it does not allow to run our software programs. If you own a beige paralllel port key, it cannot be run under Windows 10 and 11 (you should update your software as we cannot make a USB drive or download link for it).
• We regularly make improvements to our programs. These are listed in the "Most Recent" web page of each product on our web site. It is a good idea to update your software (rather than paying to get the same old software). Our new protection keys no more need a driver installation and are also a USB drive on which we put our software and manuals instead of a CD/DVD. If you are interested, please contact our sales department.
- The content of my cyan key has been deleted (partially or totally). This is the equivalent of the previous FAQ (Lost CD or DVD#12), please refer to it.
- Where can I find Regent's programs Instruction Manuals. All our programs come with a printed and pdf digital file Instruction Manuals. The latter is on your computer in the program folder and also on its CD/DVD (at the back of the printed manual) or on the Protection key storage area (cyan key only).
- Cannot Modify Sample Identification or Data in Data File: Our programs can only modify the data file content for the Analysed Region under analysis (the active region displayed in the Main Window's Image Area), not those analysed before. You can however modifiy previously saved data in a program like Excel. Make a backup of your file before doing so, in case things go wrong. 1) Import the .txt data file in Excel (see Appendix A of the program's Instruction manual), 2) Edit the data cells you want to modify and 3) Save the data file back as .txt.
- The "Color" menu commands are not active, why?: The Color menu commands are only available in some Regent's software programs (WinRHIZO Pro & Arabidopsis, WinFOLIA Pro, WinSEEDLE Pro, WinCAM Reg and Pro, WinCELL Pro & WinSCANOPY Pro).
These commands are active only when "Color analysis" is active. To activate it:
in WinRHIZO: Select "Color" to the right of "Root detection based on".
in WinFOLIA: Select "Color" to the right of "Leaf detection based on"
in WinSEEDLE: Select "Color" to the right of "Seedle detection based on"
in WinCAM: Select "Color" to the right of "Object detection based on"
in WinCELL: Select "Color" to the right of "Cell detection based on"
in WinSCANOPY: Select "Color" to the right of "Canopy detection based on"
In order to work, they also require that you load or acquire a color image (not a grey levels image).
- When and How to use Regent's Blue Background: The blue background is provided for Color analysis with a some of our software programs (see listed below). It is well suited to analyse any objects which does not have the blue color on it (roots, leaves, seedles, fruits, vegetables...).
1) Place the object to scan on the scanner glass and the blue background behind it.
2) In Image/Acquisition Parameters choose "Color" to the right of "Image type" and for WinCAM & WinFOLIA choose the "Reflective" light source. For WinRHIZO and WinSEEDLE this light is selected by default when you chooose the "Color" image type.
3) In "Root (Leaf, Seedle or Object) & Background Detection, activate Color analysis by selecting "Color" to the right of "Object detection based on".
You are now ready to scan and analyse you samples in color. For more details, please refer to "The STD4800 (or LA2400) Scanner for WinRHIZO (WinFOLIA, WinSEEDLE, WinCAM...) Installation and Utilisation" manual. You received a printed copy with your scanner and a pdf version on Regent's software protection key. Once our software is installed on your computer you also have a copy of it in its folder (e.g. "WinRHIZO Pro 2022 10 July 2023").
The blue background should not be used for grey levels analysis (or grey elevels images or when "Color Analysis" is not active).
Regent's software programs which have Color analysis: WinRHIZO Pro & Arabidopsis, WinFOLIA Pro, WinSEEDLE Pro, WinCAM Reg and Pro, WinCELL Pro & WinSCANOPY Pro.
- Load Configuration not working (Versions 2021 a and b). We just found this bug, it has been fixed for WinRHIZO (just contact us to get version 2021c). For other software programs, until we fix it there is a workaround. The order of the steps below are important. 1) Start the program, 2) Activate Misc/Load Configuration. Select your cfg file of interest. 3) Activate Window/New. You now have two Main Windows. 4) Close the one which name ends by "1" (click its top right red corner). You now only have the second window (name ends by 2) which has the cfg file settings.
- Software Licence Agreement. Our Software Licence Agreement is accessible by clicking the links below. Please take note that our Software Licence Agreement is non negociable.
For USA clients, click here
For clients outside the USA, click here
|
| 11. WinCELL |
This section contains help topics related to WinCELL.
- Microscope and Sample Preparation: WinCELL can be used with many brands of microscope from low cost to high end models. What is important is that it has a tube so that you can mount the camera on it (via a C-mount adapter that the microscope manufactuer sells) or that it can produce digital images from its manufacturer hardware.
WinCELL works with microtome prepared slices of wood. The slices with light passing through have a very good contrast between the cell lumen and walls (this is required by WinCELL). Some people have developed methods to enhance cell contrast with walls on pieces of wood directly so that images can be taken with a camera and lens or scanner (for larger cells). We have no information about how they do this. If you achieve these good contrasts then WinCELL might be used on such samples. You can send us an image to determine if WinCELL can analyse them.
|
| 12. WinDENDRO |
This section contains help topics related to WinDENDRO.
- Narrow rings, Sample contrasts and Wood Species: WinDENDRO is a semi-automatic system. When wood samples are easy to analyse (conifer), the productivity gain compared to a manual system is good and easily measurable. With deciduous species the gain is less (the operator must override many decisions taken by the system) and might be close to zero. WinDENDRO is not marketed as a speed system. It is appealing because of its approach that is differnet from manual systems. It allows you to work on stored images for example. You can go forth and back directions while you measure. It compares ring width on different radii while you make the measurements. It has many features a manual system don't have. If a ring is narrow (0.01 mm) and well contrasted they can be measured with our scanners. As soon as contrast is reduced, the number of rings that can be analysed per mm also goes down as it takes more pixels to identify what is a ring. As a general rule, if the operator cannot identify rings in the image, the automatic system will not either. You can then use WinDENDRO's manual mode.
- Sample preparation: Surface preparation depends on the smallest ring width you have to mesure. A .01mm ring width requires extremely fine sanding or the equivalent. A 1 cm ring width can be measured on a rougher surface. There is a trade-off between time spent on preparation and time spend on the analysis afterward. The better is the surface, more rings WinDENDRO will automatically find, so you have less corrections to make.
- Long Cores or Large Disks: Long samples are not easy to measure. Our largest scanner can acquire images +-43 cm (18") long. Cores longer than that can be scanned in two or more images and stiched back together in other programs (not included). A high resolution (50 - 100MP or more) camera can also be used.
- The Blue Reflectance Method in WinDENDRO: The Blue reflectance method is a surrogate for Density analysis. It was implemented in WinDENDRO based on scientific publications. In version 2012 we added commands and simplifications to it so it could be used more easily. Our own Blue reflectance calibration target (that must be scanned with each sample) allows you to make reflectance measurements very easily (WinDENDRO automatically reads the target calibration data that comes with it). You must manually click the steps target in the image (or just the first and last) and after you can get reflectance data from your samples by tracing ring paths over them (like you do for ring width analysis). Note that it doesn't correlate reflectance to density data in function of species or sites (or provide samples of known density). There are scientific publications dedicated to this subject. Note that the blue Reflectance Method consumes lots of memory (see paragraph #7 below).
- Density Analysis in WinDENDRO: You can do ring density analyses with the WinDENDRO Density version plus our scanner SLS light for x-ray films. We do not sell however the following: 1) Equipement to produce the x-ray film (irradiation chamber, developing equipement, film...) and 2) Equipement to prepare cores or disks. The WinDENDRO density program can also measure ring density from images produced by filmless x-ray cameras (like the ITRAX system).
- A get a message with an exclamation mark, what does it means? This means you have reach the memory limit of WinDENDRO 32-bit. It happens with images around 500 MB (uncompressed). See next paragraph for things you can do when you have reached that limit.
- Memory limits of WinDENDRO 32-bit. WinDENDRO 32-bit is limited to images size around 300 MB (uncompressed). When you reach this limit there are a few things you can do to overcome it: 1) You can crop your images for parts that don't have rings to measure in it, 2) scan in grey levels instead of color (grey levels images consumes four times less memory than color images for the same scan area and dpi), 3) reduce dpi if this is acceptable (you also loose some precision when doing so) or 4) Upgrade to the 64-bit version. The latter is faster and can handle much larger images. Version 2021b has been tested with images up to 8 GB in size (but should work with larger images).
- Load Configuration not working (WinDENDRO 2021 only). We just found this bug, we'll fix it soon. In the mean time there is a workaround. The order of the steps below are important. 1) Start WinDENDRO. 2) Activate Misc/Load Configuration. Slect your file of interest. 3) Activate Window/New. You now have two Main Windows (WinDENDRO1 & WinDENDRO2). 4) Close WinDENDRO1 (click its top right red corner). You now only have WinDENDRO2 which has the cfg file settings.
- Can we do crossdating and detrending in WinDENDRO?. WinDENDRO is not a crossdating program, it is for tree rings measurement. It has some basic cross-dating, detrending and spline filtering functions though, so you can visually compare the sample being measured and/or ring series (see the Ring-Widths Graphic and Crossdating Chapter 5 of WinDENDRO's manual). We call the latter reference series and these are stored in .ref2 files which can be created within WinDENDRO from one or more measured samples (rings paths). Reference series take into account from how many series they are made, so they have a weight proportional to it in calculations. WinDENDRO can display their ring widths side by side and you can shift them in time, add or delete rings to see if that improves dating. It also displays a correlation coefficient called Gleichlaufigkeit sign test. Crossdating (detrending and spline filtering) is usually made in programs dedicated to this and there are free ones (Cofecha...). They typically work with files in decadal (Tucson's) format. WinDENDRO's .txt data files can be converted to decadal with a WinDENDRO's menu command (or for older versions using the convert.exe utility program that came with WinDENDRO).
|
| 13. WinRHIZO |
This section contains help topics related to WinRHIZO.
- Why are there empty classes (bins) in the Root Distribution Histogram: This is related to the image pixel size and the fact that root diameters are measured as a multiple of it. All along the root, its diameter is measured and can be 1, 2, 3.... or N pixels wide. If pixel size is 0.15mm, then the root can be 1x0.15 (=0.15), 2*0.15 (=0.30), 3*0.15 (=0.45)....N*0.15 mm wide. So depending upon how your classes are divived it is possible that some never get any root in them (if your classes are 0.0 =to< 0.10 =to< 0.20 =to< 0.30 =to< 0.40 as example the first and third would always be zero). How to minimise this? 1) Turn on "Pixels interpolation" in Analysis/Measurements. Note that this works only with GREY LEVELS images. When it is active, WinRHIZO interpolates the root edge position to a fraction of a pixel. So diameter can be 2.24 pixels wide (insstead of 2 or 3) for example. 2) Set root diameter measurement mode to more precisely. In Analysis/Measurements, next to Precision, choose More or Maximum. 3) Modify your diameters classes.
- Why some sums of diameter class data are not equal to total values: WinRHIZO produces two volume (and surface area) data, one measured (more precise) and one estimated. The Estimated root volume is calculated from the estimated root average diameter calculated from the measured root projected area and length (using trigonometric formulas assuming roots are cylindrical). The Measured root volume is the sum of all volumes calculated along the root length using the measured diameter at these points. For a comparison of both volume measurement methods, refer to the publication below. Essentially it shows that estimated volume precision decreases when root sample diameter variations increase.
Rose L. (2017) Pitfalls in Root Trait Calculations: How Ignoring Diameter Heterogeneity Can Lead to Overestimation of Functional Traits. Frontiers in Plant Science, Volume 8, Article 898, May 2017.
The surface area and volume per diameter class of the root distribution graphic are computed precisely with the measured root diameter. For each pixel of the skeleton, the root volume and surface area are calculated with the punctual root diameter at the pixel position and added to the proper diameter class. This method is more precise than estimating the class volume and area from the class average diameter.
You can get more information about how measurements are made in WinRHIZO Instruction Manual in Appendix C.
- Slow analysis: The settings/functions below have a high impact on WinRHIZO’s analysis speed.
1) Filters in Analysis/Debris & Rough Edges Filters.
2) The Very Pale Root option in Root & Background Detection.
3) Using lasso or circular analysed regions instead of rectangular.
4) Analysing a Color (instead of grey levels) image or doing a Color Analysis (in Root & Background Detection).
5) Using Exclusion Regions.
The computer processor and RAM memory speed have a strong impact on analysis time. The WinRHIZO version also has an impact on speed. WinRHIZO 2021 is faster than 2016 which is much faster than 2012. WinRHIZO 2021 uses mutli-threading, older versions do not. Turning on "Multi-Thread" and turning off "Data 100% identical to previous versions" increase the analysis speed significantly.
- How do we verify that the data the software collects off of the root sample is accurate? Is there a way to verify or calibrate the system? If you bought a complete system from us you do not need to calibrate, only to use it correctly.
1) Make sure that Scanner.cal is installed (WinRHIZO Manual Chapter 1).
2) Scan according to our instructions (see The STD4800 or LA2400 Scanner for WinRHIZO Manual and the Video Tutorial that is in the WinrHIZO folder on your computer).
3) Verify that roots are well detected (see the Overview & Introduction Chapters in WinRHIZO Manual); a) By looking at skeleton lines (there should be a line over each all roots) and b) the Detected Roots image (roots should be black and background white). Learning WinRHIZO using our demo images and the Introduction chapter is very important as all required notions are introduced there.
- Can we scan multiple root systems per image? Yes. If you click the image, all of them will be analysed together as a single root system (one line of data for all of them). If you want data separately for each one, space them so that they do not touch each other before scanning and at analysis time make an image selection around each one. You will get one data line per root system.
- Can we cut and scan a large root system in multiple images? Yes for most analyses (root morphology and link analysis), not for some (like topology and developmental analyses which require a complete root system). If you give all subsamples the same name during analysis, their data can be merged after in XLRhizo.
- Can WinRHIZO automatically measure roots in soil? In rare situations yes. Note that we do have two families of product for root measurement.
1) WinRHIZO Tron which is a manual root tracing program. It is made for roots in soil or roots which do not have a good contrast with their background. It will work on any image in which you can see the roots (and make a calibration).
2) WinRHIZO Basic, Reg, Pro or Arabidopsis. These can automatically measure washed roots or roots with a
good contrast with their background. The Pro version (or Arabidopsis) is required for color analysis (when color is used to separate the root from their background). In some instances, the latter can be used to measure roots in soil, but for this to work the contrast must be good and/or the soil must be a different color than roots.
- Can WinRHIZO automatically measure mycorrhizae?
We have no experience in handling and preparing mycorrhizae. As such we cannot recommend a preparation method or say if a scanner can be used. We can say that images from cameras are suitable if the proper magnification is used (via lenses or microscope). There might be chances that a scanner could work for larger ectomycorrhizae.
We have received images from users over time, some of which could be analysed and some which could not. The reason for the success/failure came mostly from the variation in appearance which results from the differing preparation methods. In order to measure mycorrhizae, they must contrast with the roots and background. In some cases when the root system is too dense we can only quantify the area of the image covered by mycorrhizae, roots and the surrounding background. When the root system is not too dense and a good color contrasts is achieved between root and mycorrhizae, we can measure the root morphological parameters (root length, area, volume...) for mycorrhized and non-mycorrhized roots. In the latter case, the Pro or Arabidopsis version is required because color analysis is used.
So before recommending WinRHIZO for a mycorrhizae application we ask for a sample image taken in the real conditions of your project (an image that you plan to use for analysis).
- Root hairs. There is no special treatment for root hairs by default (with our automatic settings). They might be included in root or background data. It depends on how their grey levels are close to root vs background and this is not uniform among species, users, image acquisition settings etc. When dealing with root hairs, a manual Root & Background Detection classification might be required so that hairs data fall into the group you want. The way to determine in which group hairs have been classified is to look at the "Detected roots" image after an analysis. You can also visualize this classification while setting up the Root & Background Detection parameters (so you can choose the right ones).
Note that if hairs have a different color than roots, then Color Analysis might produce better results.
The microscope is very likely required to identify and measure hairs individually. With a scanner, it is rather an envelope that can be seen and measured (maybe some individual hairs at very high dpi).
- Nodules Nematodes. You can count nodules manually with all versions of WinRHIZO (by clicking each of them).
If nodules are not touching each other and if they have color contrasts with the roots (naturally of via staining), then some of our programs can count them (including WinRHIZO Arabidopsis version). Note that we've rarely seen situations were it worked well automatically. There is an example of both Nodules counting methods in WinRHIZO's Instruction Manual in the "Application Examples" chapter.
- Load Configuration not working (WinRHIZO 2021a and b). This bug has been fixed. Contact us to get the fixed version 2021c.
- TPU light is not used. Make sure the TPU is connected to the scanner at the back of it and that you have selected "Grey levels" to the right of "Image Type" (don't choose "Color"). Important: At startup do NOT select a TWAIN Source which name begins by "WIA...").
- Tips for a better detection of thin very pale roots. In Image/Acquisition Parameters turn "Speed priority" to off. Increase dpi (to 800 or more). If possible place roots directly on the scanner glass, aovid using water. Try the "Very pale root" option in Image/Acquisition Parameters. See the other tips in WinRHIZO Instruction manual, there is a section dedicated to this.
- Can the WinRHIZO software analyse any image from any scanner or camera? The short answer is no. WinRHIZO is a system, made of software and hardware that were designed to fit each other. Since our scanners produce highly contrasted images, free of shadows, the analysis is very easy and fast (using WinRHIZO's default settings). If your images do not meet those criteria, then default settings cannot be used and the operatr has to experiment with different settings. The analyiss is thus more complex, difficult, time consuming and most of the time less accurate than those made on our scanners' images. The most frequent problems that we see is that not all roots are detected or that artefacts (shadows, debris...) are analysed as roots. Although there are filters to remove some of such artefacts, it is not guaranteed that they will work. Over the years we added features to allow to analyse roots from different media or imaging device. These must be tested before purchase to determine if WinRHIZO can analyse them or not. Please note also that when no hardware is purchased from us, our people at technical support won't be able to help in case of problems (in other words, we only support the hardware we sell).
|
| 14. WinRHIZO TRON |
This section contains help topics related to WinRHIZO Tron.
- Manual vs. Automatic Root Analysis: "WinRHIZO Tron" is an entirely manual root tracing program, It means that to measure roots, you must trace them interactively (manually). We have another product called "WinRHIZO Basic, Reg, Pro or Arabidopsis” which can do automatic root measurement but it is for washed roots (roots extracted from soil). Sometimes it can be used to automatically measure roots in soil (when contrasts between roots and soil are good). We can tell if the automatic version can be used for your samples if you send us an image.
- WinRHIZO Tron program crashes when opening an image: (versions prior to 2022) it was caused when a non ICAP compliant image name was used while the latter was active. To fix this there are two options: 1) make sure your image name is conform to the ICAP Naming Scheme or if it is not 2) turn off "Use ICAP Naming Scheme" in Analysis/Parameters.
- Cannot activate the New Calibration command: This bug is now fixed, but if your version has it there is a workaround: Choose the "Intrinsic" Calibration Method. Load your image with a scale. Change the calibration method to "Scale in image". "New Calibration" is now active.
- Cannot Modify the Sample Identification, Root Name or Properties in Data File: WinRHIZO Tron can only modify the data file content for the image under analysis (green region where roots are currently being traced), not those analysed before (red regions). You can however modifiy previously saved data in a program like Excel. Make a backup of your file before doing so, in case things go wrong. 1) Import the .txt data file in Excel (see Appendix A of WinRHIZO Tron's Instruction manual), 2) Edit the data cells you want to modify and 3) Save the data file back as .txt.
|
| 15. WinSEEDLE |
This section contains help topics related to WinSEEDLE.
- How good is WinSEEDLE for very big seeds (Oak)? When seeds are big (over 1 cm) you will get more precise measurements with images acquired from a camera. The WinSEEDLE program (like all our other programs) can analyse images that come from a camera or scanner. You can use almost any digital camera provided you have a good setup for image acquisition (one that provide good contrasts between seeds and background, free of shadows). You will also need a device to hold the camera above the seeds and a calibration target (scale, ruler...).
- TPU light is not used. Make sure the TPU is connected to the scanner at the back of it and that you have selected "Grey levels" to the right of "Image Type" (don't choose "Color"). Important: At startup do NOT select a TWAIN Source which name begins by "WIA...").
|
| 16. WinFOLIA |
This section contains help topics related to WinFOLIA.
- How portable is WinFOLIA? Our current LC1200P scanner get its working power (energy) from a computer via a USB connection (which is also used to transfer the images). It is TWAIN compatible which means WinFOLIA can acquire and analyse images from it directly (without the use of another program). To operate this scanner, a computer is required in the field. Scanning images in the field is not as easy as in the lab but is feasible. Some computer screens are not easy to read under the sun (plan for an umbrella) and care must be done to avoid water or excessive humidity for the computer and the scanner. Analysing images in the field can be done but the risk of wrong analysis is greater than when done in the lab where the user can take time to verfiy it. The risk is lower if simple analyses are done (leaf area). Another option is to scan in the field, store the images on the computer disk and analyse the images interactively or in batch in the lab.
Leaves can be removed from the plant for easier scanning or can stay on the plant for non destructive scanning. In the latter case, the user must be able to bring the scanner and computer close to the plant and the petiole must be long enough to place the leaf on the scanner (without missing leaf area).
Note that a desktop scanner with ou SLS light such as our STD4800 or LA2400 models offer one more option for leaf analysis. The images made with this light are ususally more contrasted.
|
| 17. WinSCANOPY |
This section contains help topics related to WinSCANOPY.
- Using WinSCANOPY with camera and lens other than those sold by Regent. You must indicate in your image the hemisphere centre and the radius corresponding to the 180 degrees field-of-view (FOV) which corresponds to the horizon. Note that fish-eye lenses have different FOV. Sometimes it is 180 (the radius matches the canopy/sky content or non black area) but frequently we see 185 and sometimes more. In such cases you must determine the 180 FOV experimentally. You must do so at the camera highest resolution. If you acquire images at lower resolutions afterward, WinSCANOPY will automatically scale the radius to fit the image. It is important however to always use the same image aspect ratio. DSLR cameras typically have a 3:2 ratio but some cameras also offers 3:4 or a 1:1 ratios. The latter is better as it produce smaller images with less black area.
Then you must determine, experimentally or from the lens manufacturer specifications, the lens calibration parameters (non linearities of elevation in function of distance to hemisphere centre) and enter them in Hemisphere/Camera & Lens/Lens Calibration.
Once you have entered you camera and lens specifications in Hemisphere/Camera & Lens, these will be used for all images you analyse until you modify them. It is best to save your WinSCANOPY settings (that includse your camera and lens) in a configuration file (using Misc/Save Configuration). This way you'll have a backup copy and it also allows you to switch cameras and lenses rapidly (using Misc/Load Configuration).
If you own one of our camera and lens, all this work is done by us and all you have to do to analyse an image is to click it. The hemisphere position and size will be known to WinSCANOPY and the right lens calibration parameters will be used. All this information is stored in the "Lens.cal" file that comes with our systems, so it is important to select "From file Lens.cal" in Hemisphere/Camera & Lens (it is active by default).
|
|